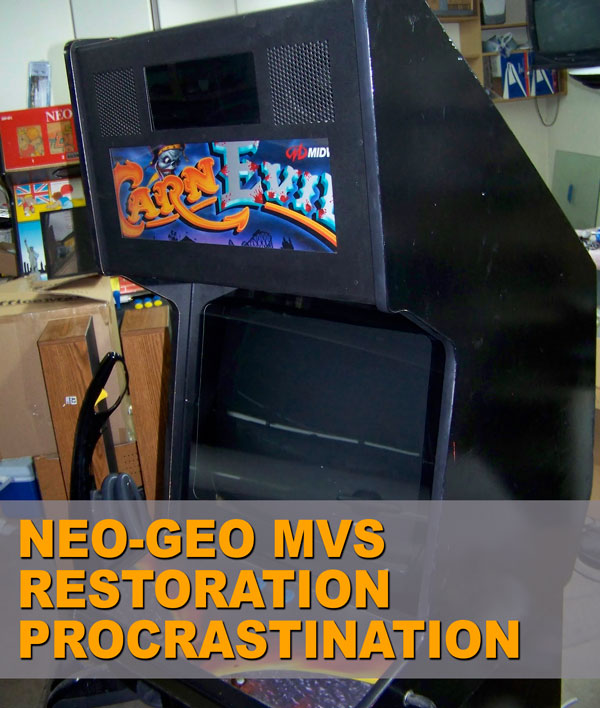

Back in 2007, I purchased arcade cabinet that was a carcass of one of my favorite arcade machines, a Neo-Geo MVS 4 Slot. All the unique components that made it a Neo-Geo was ripped out and was converted into one of my most loathed on-rail shooters, CarnEvil. Seriously, I really do hate CarnEvil and seeing that game inside a Big Red frame made me want to restore this cabinet into is former glory. So, I paid $200 for a machine that had some much potential in becoming one of and did my best to make this into one of my most desired machines. I dragged this machine into my garage and started my restoration. I started with removing the marquee and the control panel overlay. Sadly, I had to throw the original panel cover away because I wanted to replace it with a new Neo-Geo MVS overlay. I then removed all the light gun cabling and proceeded to fill in the holes with bondo. I pulled out the coin mech, only to literally throw it away on accident during one of my many moves. You see, I had this cab half-finished but for a good chick of time, it sat inside a storage unit because I did not have the space to work on it and during one of my many moves between apartments, the coin door was placed in a pile of scrap that got tossed out with the trash. So yeah, freaking awesome. Anyways, I am getting ahead of myself. When I had the room and the garage space to move about, I disassembled the cab by removing the old control panel and the coin doors to make sanding easier. I filled in all the holes that was used for the gun holsters and eventually sanded down the machine to reveal the original red underneath the black coat of paint.

I found myself enjoying the sanding process. I wanted the cabinet to be as close to perfection as humanly possible. This was going to be my first legit Neo-Geo and I wanted it to be flawless. Yeah, I got over myself eventually. What is most important when working on an arcade cabinet is that if you are painting, you must put in the time, or all the flaws will show through the paint. Now I understand why so many cabs are just use sheets of vinyl overlays because to cover the imperfections with a thick wrap is easier than filling in the divots with bondo and sanding everything back down as evenly as possible. Eventually, I was able to obtain the correct upside down “T” shaped marquee for this Neo-Geo cabinet. I took this over to Home Depot to have the color match as close to the stock SNK Red. I decided to just use oil base paint and to just roll it on the side. I didn’t want to invest in a spray gun, and I didn’t want to build a makeshift booth to paint this cabinet in my garage. I personally feel the roller gave me more control of the paint. By the time I finished giving the sides and front 3 layers of paint, the paint ended up looking fantastic. So, one late night, I installed a brand new monitor and began to wire up the control panel. For some stupid reason, I needed to pull the display back out to install the shelf for the four slot to rest inside this cab. The previous owner did a number on the inside of the machine. While I was pulling on the display, I overlooked disconnecting the wires and I heard a loud crack, I damaged the power lead on my monitor’s PCB. I was furious with myself. Due to my dumb mistake, I broke a brand-new CRT. That is when I took a break from this cab that ended up being over three years because I got more machines that diverted my attention. By the time I got back to work on this machine, over a decade had passed. I accumulated many cabinets over the years and I grew tired of having to move so many cabinets from place to place. I eventually ended up just keep a total of 4 cabinets, with the Big Red being one of the four. The rest were sold off, cabinets that needed extensive work were trashed and finished machines were just out right given to friends as gifts. My big red was finally found its forever home in my garage at my current home. I finally decided to get this machine finished because I was wanting to add a couple more to the collection but the Mrs. said, "How about finishing that one in the garage first before buying more projects.

Who am I to argue with perfection? Breaking the monitor is what took the wind out of this restoration project, so I just sucked it up and got it repaired by Sharp Image Repair in Las Vegas. I had a coworker sand down my control panel and replacement coin doors. He was able to make them look almost brand new again. Now the control panel was glossy, I rewired the machine and got the harness back to MVS standards, installed a new control panel overlay, installed all the accoutrement that makes a Neo-Geo a legit Neo-Geo like the credit LEDs, memory card/stereo PCB, and some amazing aftermarket mini marquee led lamp. I reused the joysticks because they were actual American made Happs Control joysticks with a 5 lbs. spring mod installed and not the crumby modern Suzo-Happs sticks that play like trash. The last thing I did to this cabinet was installing the new t-molding and rolled into its home in my home arcade. The only thing I need to do is to install the side decals, but I want to try and buff out some of the scratches on the sides or do one last coat of paint to make it look new again. She got a little scuffed up being moved around all these years but all in all, the Neo-Geo big red is completed, and I am so happy to have finally completed this project and restored this cabinet to its glory. What surprised me is that everything works. I have expected the credit LEDs to give me some trouble, but they are bright, the memory card reader works and save games perfectly, the headphone jacks are crystal clear, and that display is just amazing. Even though this project has taken me over a decade to complete, I regret nothing. I am glad I was able to save this junker cabinet and turn it back into a Neo-Geo MVS 4 Slot. The future is now.
--Nathan


No comments:
Post a Comment