Archival Article from Pineconeattack.back in 2008. It's about upgrading to LEDs on my Williams Big Ben Pinball machine. This table was stolen from me back in 2010 and I just got it back this week. So I'll probably be posting pinball videos in the near future, after a 15 year hiatus due to theft.
We chat with friends about video games, movies, & documenting our retro gaming projects.
Showing posts with label How To. Show all posts
Friday, August 22, 2025
Big Ben Pinball upgrade (cir 2008)
Thursday, November 9, 2023
How to Customize Your Mayflash F500 V2 Fightstick
So Street Fighter 6 got my interests piqued for modern console fighters once again and now my niece has taken a strong interest in the genere and began to dabble with the game. Struggling to wrap their head around the Classic control scheme, they have become fairly proficient using the Modern control scheme, which saddens my cold black jaded heart. So I decided to take it upon myself to build them their very own fightstick with artwork from their favorite comic series to hopefully get them accustomed to classic arcade control scheme.
My logic is that with a 6-8 button setup the and a good joystick, the traditional Classic control scheme will make a bit more sense to them. I know it's going be a struggle to have to learn input timing, but I'm hoping to get them a fightstick that they would want to play all of their games on. Since they have access to a PS4, Xbox One and a Nintendo Switch, I opted to get the Mayflash F500 V2 base model, the Mayflash F500 Elite was more expensive and it did not make sense to gut a stick that already had authentic arcade parts. I will show you how to replace all of the buttons, replace the joystick with a Sanwa joystick and add custom artwork.
Friday, October 6, 2023
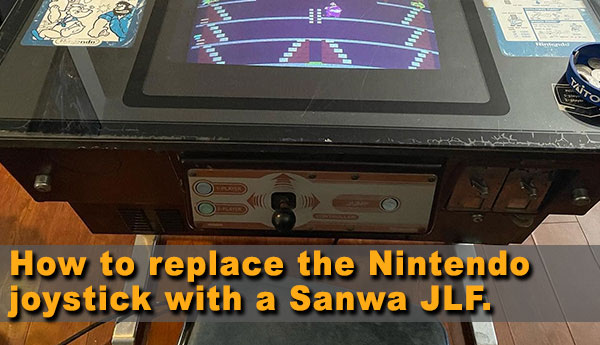
How to Install a Sanwa JLF into a Nintendo Cocktail Cabinet
I do not like their range of motion, the ball top are always too small and I just never liked the feel of using one. I always feel like I'm struggling against the sticks and even after refurbing them, they still felt stiff and clumsy as ever. I found a great deal locally where I picked up this Popeye Nintendo Cocktail machine and brought it home. It's in pretty good shape; the price was right eventhough the monitor could use a new cap kit and the control panel is just at a weird uncomfortable angle but that's just the quirks of a very old Nintendo cocktail cabinet.
I generally veer away from Nintendo cabinets because I prefer jamma cabinets and the ablity to swap out boards, but I actually really like this game. While I would never go out of my way to defend Popeye as one of Nintendo’s better arcade games, because Donkey Kong exists, it just has a special place in my heart that brings back great memories of when I was a kid playing the Popeye port on my Dad’s Atari 2600.
I do have a huge appreciation to Nintendo's build quality of their cocktail cabinets. The first thing that stands out to me about this machine is how it is mostly made of metal, instead of wood like my Pac-Man cocktail. I've been on a collecting tangent where I'm picking up older cabs to fix up and learn from but hey, at least I get to play Popeye with a Nintendo joystick that always feels like a struggle, right?
Wrong.
It was brought to my attention from BirdlandArcade on Instagram that you can easily remove the Nintendo joystick and swap it out with a standard Sanwa JLF. Needless to say, that really piqued my interest and I wanted to do this mod to my cabinet.
Here's how...
Thursday, June 18, 2020
Organizing my CPS2 Collection
I don't have a huge collection of CPS2 carts but I have enough where they are all stuffed inside a couple of bins sitting out in my arcade room. While they are sort of organized, I want to be able to access them with ease and I wasn't sure the best cost effective way to do this. That's when I found the "CPS2 Kitbox Label Guide" by dubdubdub.
Basically, you make custom labels for each board, print them out, then slap then on a Uline box, finally, cut down your foam and glue it down inside of the box. What you end up with is a nice, clean, organized box that can sit on a shelf for easy access. The easy part was to make all of my labels, then place them all on a sheet and have them printed out 6 at a time. Here's the template I made if you want to print up 6 at a time. After having them printed out at FedEx Office, I used their paper trimmer and cut out each label, because I'm cheap and I didn't want them to over charge me to cut these out.
I made up my labels then ordered my boxes and foam. Sadly, the price of the 1" foam increased $5 to $19.99 per yard and is a pain in the ass to cut with a razor blade. Next batch of foam, I will actually follow dubdubdub's suggestion of using a sharp bread knife. So for now, I only have two boxes 100% completed with 13 more to go. So every payday, I'll probably just pick up two order of foam and slowly knock these out 4 at a time every par period.
All in all, I do like having my CPS2 carts easily accessible and they do look nice on a shelf. I'll have to adjust the foam for my Hyper Street Fighter because it is a little wider and shorter than the standard B cart but all in all, I'm happy. Once I'm done with this project, I'll probably do something similar with my bare arcade PCB. If you have any suggestions, comment on this post. It would be appreciated.
Thursday, May 28, 2020
Building a Universal Arcade PCB Holder
As a collector, I rotate through my arcade games frequently, and having to mount the PCBs everytime I want to play a game got tiring very fast. So here's a simple fix. By attaching a universal PCB holder to a piece of wood I can keep my PCBs secured from shorting out on the metal interior of some of my cabinets while also making them easy to move around if I'm playing the PCB on my Supergun rig.
I wanted mine to look nice so I just purchased a bamboo cutting board from Amazon. I know this isn't groundbreaking but I'm always shocked to see fellow enthusiast running arcade PCBs all haphazardly. Just screw the PCB Holder onto the cutting board and add rubber feet to the other side to keep the cutting board from sliding around and just like that, you made yourself a versatile tool that will help protect your arcade boards and also make playing them a lot easier.
Enjoy!
--Nathan
Friday, May 15, 2020
Fix Your NES Controller & While You're At It, Customize it!
I love customizing my gaming hardware especially gaming controllers. They are one of the easiest to get parts for and the NES Controllers are also one of the easiest things to customize. You really don't need to be a "professional modders" to make your NES controllers look great. Granted, you can always buy a premade controller but if you do a quick search on Etsy or Ebay, you see a lot of people are selling premade customized controllers for some outrageous prices. I like the feeling that with a little effort and some fairly cheap parts, I can be playing my personalized controller that not only plays well, but looks awesome. The one thing I can confirm to all of you import Famicom gamers is that the controller membranes are 100% compatible with the NES kits. The inside of the controllers are the same, with the only exception being the 2nd Controller on the original Famicom due to the microphone.
What you will need:
- (x1) NES Controllers
- (x1) NES Controller Membrane Kit
- (x1) Small tipped Phillips Screwdriver
- Cotton Swabs
- Rubbing Alcohol
- Old Toothbrush
Optional Items if you want to Customize Your Controller.
- (x1) Vinyl Dye or Spray Paint
- (x1) Custom Controller Overlay
- (x1) Custom DPad & Buttons
Monday, January 28, 2019
Part List for Making your own Fightstick from Scratch
Making joysticks or fight sticks can be a daunting task if you have never done it before. I was building a pair of game specific joysticks for "Buriki One" and decided to just make a video documenting the process. Granted, I stained the box and pre-drilled where I want the buttons and joystick to be to conserve time but all in all this should be a nice first step for someone wanting to build a controller for themselves.
Please note: The controller in this video is for my supergun, which is an external box that plays arcade boards and the controller ports are set to arcade specs, so I do not need a controller pcb. Hardwiring the Neo-Geo extension cable to the fightstick components will work fine for this specific setup. If you are looking to build a fightstick for the Xbox 360/One and PS3/4, I strongly recommend just buying a Brooks Universal Fighting Board. Also, SlagCoin where you want to go for your joystick template.
I have linked all of the parts used in this video below. Mixed and match however you want. I personally used the IL joysticks because I wanted to save a few bucks and I didn't want to invest too much on a joystick that I will be using for only one game. I plan on building a Neo-Geo controller using all Japanese components in the near future so stay tune for that.
Part List:
- Gray-white Waterproof Plastic Project Box Enclosure 200x120x75mm
- IL (Industrias Lorenzo) Joystick
- Seimitsu 30mm screw button push buttons
- Seimitsu 24 screw button push button
- Blue Vinyl Dye
- 28 AWG Stranded Wires
- Soldering Iron
- Neo-Geo MVS/AES Extension Cable
- Wire Strippers
- Multimeter
--Nathan
Wednesday, October 4, 2017
NES Upgrade: Replace your 72 Pin connector
This was another article that I wrote for Pineconeattack back on 02.10.2013. While replacing the 72 pin connector is pretty drastic, I never had any issues with the aftermarket parts being too tight. I guess you miles may vary. One of these days I'll get around to doing a walk-through for the Blinking Light Win apparatus. I
hope this article will still be useful to those in need of repairing your NES. I will keep it up here for archival purpose.
--Nathan
The Nintendo Entertainment System, easily one of the most iconic and leading gaming console from the 80’s selling into the millions across America, capturing the imaginations of children while firmly grasping at the wallets of parents. For every coin collected, every duck shot, and for every Princess saved, the Nintendo Entertainment System has filled me with great memories including strange gaming rituals like blowing into the cartridges, clicking up and down and hitting power and reset. Wonky rituals that I do just so I can play the damn thing. As popular as the NES was, Nintendo really cheaped out on the one main component that actually have the console work: the 72-pin connector.
So what is the 72-pin connector?
The 72-pin connector is what makes contact to the game cart and the
main motherboard. The pins over time will begin to separate and the
cartridge doesn’t make a tight connection and that’s when the video will
glitch out or you just get that blue screen. Lucky for you, it’s really
an easy cheap fix to make your NES work better than before. Just
replace the 72-pin connector.
And here is how to do just that, but before that he's the standard warning:
WARNING:
Attempt at your own risk!
DO NOT ATTEMPT unless you have some technical skills and can follow
instructions. This walkthrough is as simplified as I can make it so if
none of my instructions makes any sense then please DO NOT ATTEMPT.
This project will void your warranty.
[Pineconeattack (Outdated References) will not take any responsibility if you kill your NES.]
Wednesday, September 27, 2017
How to Change the Suicide Battery on the CPS2 Arcade Board (with video)
So this is my CPS2 battery swap article from 02.06.2009 from Pineconeattack. This is the one thing I literally do once every 5 years. If you have a lot of CPS2 boards, I strongly suggest buying the batteries in the exact quantities and hopefully you can get a price break for buying them in bulk. I hope this article will still be useful to those in need of replacing your battery. I will keep it up here for archival purpose.
--Nathan
I’ve been collecting arcade hardware for a few years now and I’ve learned one very important thing about this hobby: knowledge is everything and the more you know the better you can preserve your growing expensive collection. You have to keep in mind that some older arcade games have the dreaded suicide battery that kills the functionality of your board when the on board battery dies. This is a big bummer for me since some of my more favorite arcade boards have this appalling flaw and as a general rule, I tend to stay away from them BUT some of the boards are easily swappable if you know what you are doing. From my experience the easiest board to swap the battery is the CP System 2 board by Capcom.
There’s plenty of write ups on forums and websites but none of them that I could find can satisfy my fetish for illustrative step-by-step walkthroughs. So with this in mind, if any of the pictures do not make any sense, then read the paragraph associated with it, hopefully that should answer most of your questions. If you still do not understand, please leave a comment so I can amend the walkthrough for future readers.
[Please note that this walk-through is based off of Razoola’s informative guide from CPS2Shock. All credit goes to him for helping out the arcade community with his informative write ups.]
WARNING:
This is a simple project if you have some technical skills. This walkthrough is as simplified as I can make it so if none of this makes any sense then please DO NOT ATTEMPT. This project will void what little warranty there may still exist for your board. The moment the old battery is removed you have less than 1 hour before the ROM on the PCB will die.
Attempt at your own risk!
Tuesday, September 26, 2017
How To Mod The Madcatz Fight Stick with Seimitsu Parts.
This is probably my most requested walk-through articles on how to upgrade a Madcatz Standard Fight Stick that I originally wrote for Pineconeattack back on 08.06.2009. I hope this article will still be useful to those still modify and upgrading your fightsticks. I will keep it up here for archival purpose.
--Nathan
The fighting craze is back in an upturn for the mainstream but you can take advantage of this trend by picking up some of the best joysticks out for the North American market which is the Madcatz Tournament Edition fight joystick with 100% Sanwa arcade joystick and buttons. Of course such awesomeness does come at a hefty price tag of $150.
The problem is that not everyone can justify the hefty high price tag for an expensive joystick to play Street Fighter IV, Blazblue or King of Fighter XII so many have opted to pick up the cheaper Madcatz Standard Fight Stick. Good news! This guide will show you how to get your cheaper standard fight stick up to arcade standards by upgrading the components yourself, which can save you some money or at very least make it so you don’t have to come up with $150 immediately.
Of the cheaper joysticks at are readily available in your retail chains, you basically have a choice between the Hori EX2 and the Madcatz standard fight stick. I’ve already shown you how to replace the buttons and joystick on your Hori EX2 in past walkthroughs with Sanwa parts and I even shown you how easy the Madcatz fight stick can be upgraded with Sanwa joysticks and buttons in my video, but now I would like to kick up notch, so to speak, by really making this Fight Stick into something truly original and bad ass by staining the case, adding custom artwork, installing Seimitsu joystick and adding art in your Seimitsu buttons. By replacing the stock joystick you will also avoid the headaches with substandard suicidal Madcatz quality parts.
The one thing that I freaking LOVE about the Standard Madcatz Fight Stick is that it’s so damn easy to modify. You do NOT need to have any soldering skills to replace the joystick or push buttons to improve the Madcatz Fight Stick’s reliability and performance. A lot of forward thinking was used to design this stick and you can get it up to speed with the expensive $150 Tournament stick big brother by replacing the buttons and joystick with minimal effort or go hog wild and customize it to your heart’s content.
This walk through will show you step-by-step on how to disassemble the standard Madcatz Fight Stick and get it ready for staining as well as applying custom joystick art, walking you through adding art work in your Seimitsu push buttons and the little quirks on getting a Seimistu joystick to work with the existing wiring setup. Please understand that my goal in this how-to walk through is to provide you with plenty of pictures with a “by the hand” approach to present the most complete and comprehensive guide so anyone from beginners to the experts can mod their own joystick with ease.
WARNING:
Attempt at your own risk!
DO NOT ATTEMPT unless you have some technical skills and can follow instructions. This walk through is as simplified as I can make it so if none of my instructions makes any sense then please DO NOT ATTEMPT.
This project will void your warranty.
[Pineconeattack.com (Outdated References) will not take any responsibility if you kill your joystick.]
How to Mod the Hori EX2/Hori Wii Fighting Stick with Actual Sanwa Joystick and Buttons
Here's one of my walk-through articles on how to modify your Hori Wii Fighting Stick/EX2 that I originally wrote for Pineconeattack back on 03.07.2009. I hope this article will still be useful to those still modify and upgrading your fightsticks. I will keep it up here for archival purpose.
--Nathan
The Hori EX2 walk-through seems to be a huge success with the community but I’ve been getting a lot of e-mails on people wanting a walkthrough on two topics: How to add a Sanwa joystick in your Hori EX2 & how to mod the Hori Wii Fighting Stick. Well since I was in the need for a good joystick for Tatsunoko vs. Capcom and I wanted a joystick that played better than the stock stick, well good news, I finally finished modding my Wii Fighting stick with Sanwa push buttons & an authentic Sanwa joystick. It wasn’t as difficult as I expected but it defiantly was time consuming to figure out what needed to be trimmed, but more on that later.
The Wii Fighting Stick and the Hori EX2 are practically the same stick so this walkthrough will cover both sticks and probably the PS3 Hori EX2 stick as well. The main difference between the Xbox 360 Hori EX2 and the Hori Wii Fighting Stick is the addition of buttons on the Wii stick. Additional buttons means a different PCB. The process to modify each stick is identical so do not let the different boards confuse you.
Please note that the PCB on the Hori EX2 & the Wii Fighting Stick is very sensitive and has a tendency to commit suicide and like most PCB: do not touch the board unless you’ve grounded yourself and not charged with static. Static kills boards. Also do not over heat the solder because it will splash on the board which may cause a short.
This mod is more difficult than the first Hori EX2 and you will need a Dremel tool or something equivalent that can cut through plastic because you will be doing a LOT of cutting & grinding to the Sanwa joystick mount to get it to fit inside the Hori EX2/Wii Fighting Stick. I will not be replacing the joystick art because I want my Wii Fighting Stick to keep with the Wii’s sterile aesthetics, ie: I was too lazy to care.
The only noticeable exterior changes I made was replacing the last two blue buttons with white ones because I loathe 8 button configuration but I refuse to just plug them up because you never know when you might need them for a game. With the end buttons white, I can easily ignore them during game play. I also had to use some photos from a previous project to fill in the missing photos that I forgot to take, so hopefully this will not confuse anyone.
WARNING:
Attempt at your own risk!
DO NOT ATTEMPT unless you have some technical skills and can follow instructions. This walkthrough is as simplified as I can make it so if none of my instructions makes any sense then please DO NOT ATTEMPT.
This project will void your warranty.
[Pineconeattack (Outdated References) will not take any responsibility if you kill your joystick.]
How to Mod the Hori Fighting Stick EX2 with Authentic Arcade Parts (Xbox 360 Version)
Here's one of my walk-through articles on how to modify your Hori Fighting Stick EX2 that I originally wrote for Pineconeattack back on 12.07.2008. I hope this article will still be useful to those still modify and upgrading your fightsticks. I will keep it up here for archival purpose.
--Nathan
The Hori Fighting Stick EX2 is a good stick that I got pretty cheap, but like all stock joysticks, there are plenty of room for improvements. In my review of this stick, I brought up two minor complaints with this stick: mushy buttons and the square restrictor plate. Well, here’s the walk-through on how to fix these issues. With a little soldering skill and plenty of patience, you can make this good stick into an incredible one and it’s not as hard as you might think.
Pineconeattack (Outdated References) will not take any responsibility if you kill your joystick.
(UPDATE: If you are looking for more joystick projects then head over here to add an actual Sanwa Stick inside your Hori EX2 or here to mod the MadCatz Fight stick.)
WARNING:
This is a simple project if you have some technical skills. This walkthrough is as simplified as I can make it so if none of this makes any sense then please DO NOT ATTEMPT. This project will void your warranty.
Attempt at your own risk!
Subscribe to:
Posts (Atom)
-
So Street Fighter 6 got my interests piqued for modern console fighters once again and now my niece has taken a strong interest in the gen...
-
Here's one of my walk-through articles on how to modify your Hori Fighting Stick EX2 that I originally wrote for Pineconeattack back on ...
-
This is probably my most requested walk-through articles on how to upgrade a Madcatz Standard Fight Stick that I originally wrote for Pinec...